
Are you looking for a fun, creative activity that requires nothing more than a single sheet of paper? Origami birds are the perfect introduction to the fascinating Japanese art of paper folding. In this comprehensive guide, I’ll walk you through creating a beautiful origami bird in just nine simple steps. Whether you’re crafting with kids, looking for a stress-relieving hobby, or simply wanting to create something beautiful with your hands, this beginner-friendly origami bird tutorial is exactly what you need.
The Magic of Origami Birds
Before we dive into folding, let’s take a moment to appreciate why origami birds have captivated paper artists for centuries:
- They represent freedom and grace in a tangible form
- They require no special materials—just a single sheet of paper
- They can be created in minutes once you know the technique
- They make beautiful decorations for any space
- They’re perfect for developing fine motor skills and patience
Let’s get started with creating your very own origami bird!
Materials You’ll Need
One of the joys of origami is its simplicity. For this project, you’ll need:
- A square sheet of paper (origami paper works best, but any paper cut into a square will work)
- A flat surface to work on
- Your hands and a bit of patience
- Optional: a bone folder or ruler for creating crisp creases
Pro tip: While traditional origami paper offers the best results due to its weight and texture, you can use anything from printer paper to colorful scrapbooking paper. Just make sure it’s cut into a perfect square before you begin.
Step 1: Start with a Square Sheet

Every origami creation begins with the right foundation:
- Start with a Square Sheet – The diagram begins with a blank square piece of paper.
- Place your paper on a flat surface, smoothing out any existing creases.
- If your paper has different colors on each side, decide which color you want to be visible on the outside of your finished bird.
- Position the paper as a square (not a diamond) with the color you want on the outside facing down.
The quality of your origami bird begins with this simple step. Taking the time to choose the right paper and position it correctly sets you up for success with all subsequent folds.
Step 2: Fold into a Triangle

Now we’ll create the first fundamental fold:
- Fold into a Triangle – The paper is folded in half diagonally to form a triangle.
- Take the bottom right corner and fold it up to perfectly meet the top left corner.
- Press firmly along the fold line, creating a sharp crease from edge to edge.
- Unfold the paper, then repeat with the other diagonal (folding the bottom left corner to the top right corner).
- When you unfold again, you should have visible crease lines forming an X across your square.
This step creates the essential reference lines that will guide all your future folds. The precision of these initial folds affects the symmetry and appearance of your finished bird, so take your time to ensure corners align perfectly.
Step 3: Rotate the Paper

This step prepares your paper for the next series of folds:
- Rotate the Paper – The folded structure is turned upside down, positioning the triangle downward.
- If you’ve just unfolded your paper from the previous step, refold it along one diagonal to form a triangle.
- Position this triangle so the longest edge (the folded edge) is at the top and the single point is facing down.
- Make sure the paper is centered in front of you with the point aimed directly toward you.
This orientation is crucial for the next steps. Think of it as positioning your paper on a compass—the point should be facing south, while the folded edge runs east to west.
Step 4: Create Wings
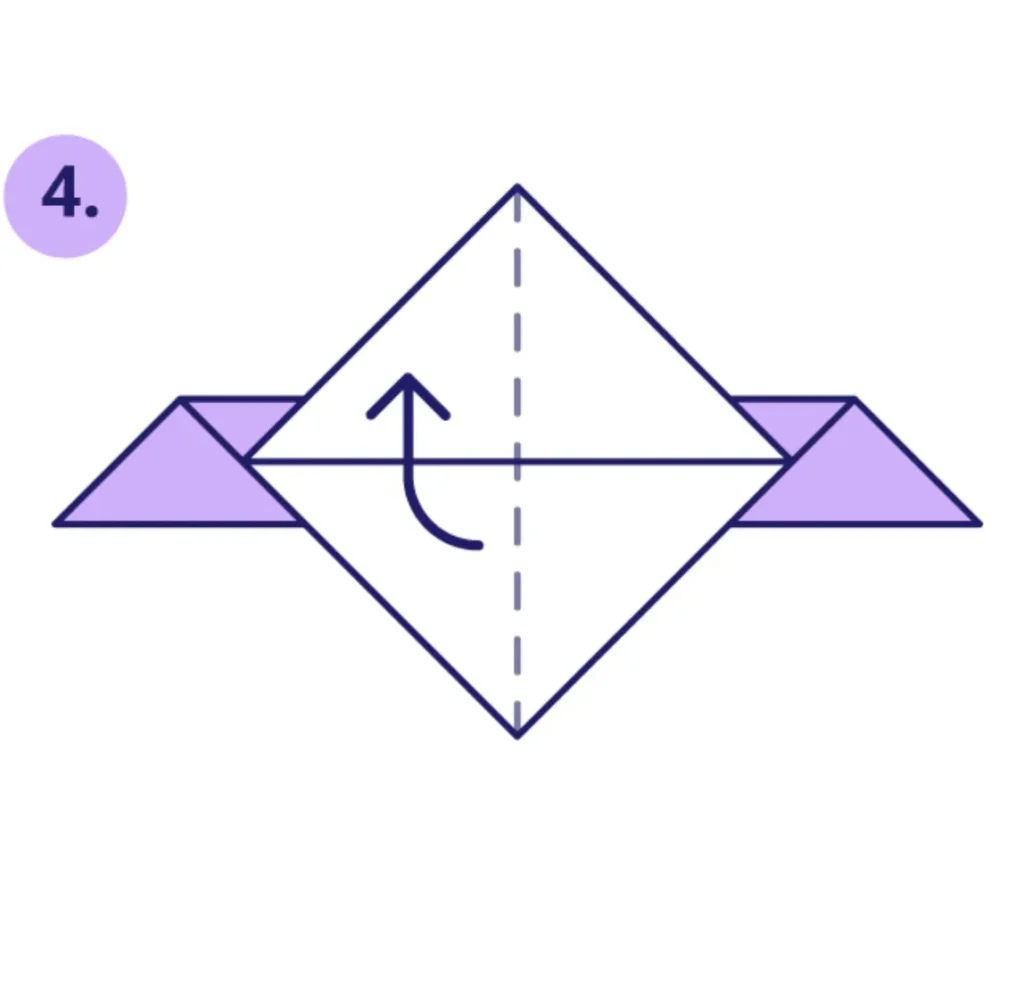
Now we’ll begin forming the distinctive features of your bird:
- Create Wings – Side flaps are folded down to form wing structures.
- Take the right corner of your triangle and fold it down toward the bottom point.
- The fold should create a straight line from the top center of the triangle to about halfway down the right side.
- Repeat this fold with the left corner, creating symmetrical wings.
- Press firmly on both folds to create sharp creases.
As you complete this step, your origami creation will begin taking on a more distinctive shape. The symmetry of these wing folds is essential for creating a balanced bird, so take care to make them as even as possible.
Step 5: Body Formation

This step transforms the flat shape into a three-dimensional form:
- Body Formation – The center section is lifted to shape the bird’s body.
- Identify the central portion of your model between the two wing folds.
- Gently lift this center section upward, creating a ridge along the center.
- This central ridge will become the body of your bird.
- As you lift, the wings will naturally fold downward.
- Press along all creases to reinforce the three-dimensional shape.
This transformation from flat paper to a 3D form is one of the most satisfying moments in creating your origami bird. The central ridge gives your bird substance and form, while the downward-angled wings create the classic bird silhouette.
Step 6: Create the Bird’s Head & Tail

Now we’ll define the distinctive head and tail:
- Create the Bird’s Head & Tail – Additional folds are made to form the head by lifting and tucking one corner, while the tail is also shaped using precise creases.
- Look at your model and decide which end will be the head and which will be the tail.
- For the head: Fold the point slightly upward and inward, creating a small triangular fold.
- For the tail: Fold the rear point slightly upward, creating a tail that extends from the body.
- These folds should be small and precise, as they define the character of your bird.
The head and tail folds transform your model from an abstract shape into a recognizable bird form. The angle and size of these folds determine whether your bird appears to be looking up, down, or straight ahead.
Step 7: Refine the Wings & Body
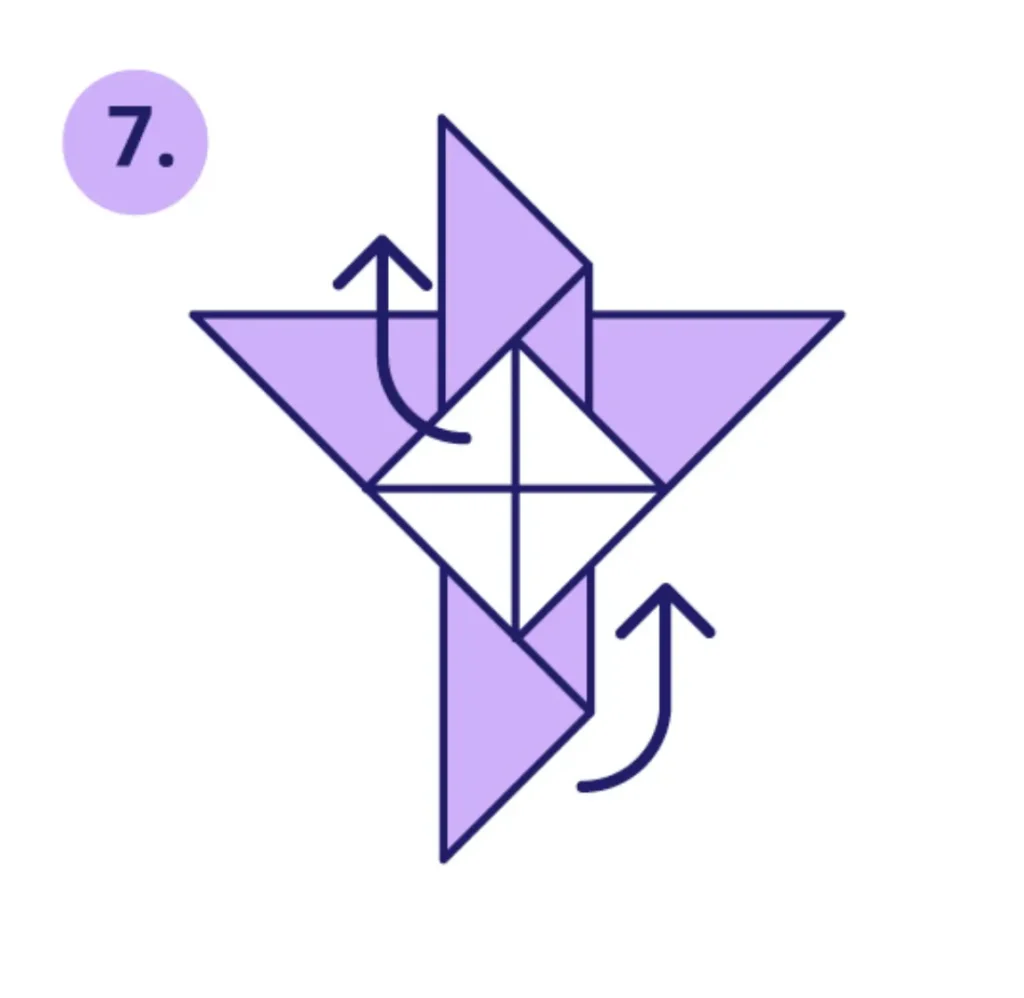
In this step, we’ll enhance the bird’s proportions:
- Refine the Wings & Body – Adjustments ensure the wings are properly aligned, and the body structure is reinforced.
- Gently pull the wings outward to extend them from the body.
- Adjust the angle of the wings—more horizontal for a flying bird or more vertical for a perched position.
- Reinforce the center fold of the body to maintain its three-dimensional shape.
- Make sure both wings are symmetrical and positioned at the same angle.
These refinements transform a basic bird shape into a more realistic representation. The wing position dramatically affects the character of your origami bird—experiment with different angles to create various poses.
Step 8: Head & Tail Adjustments
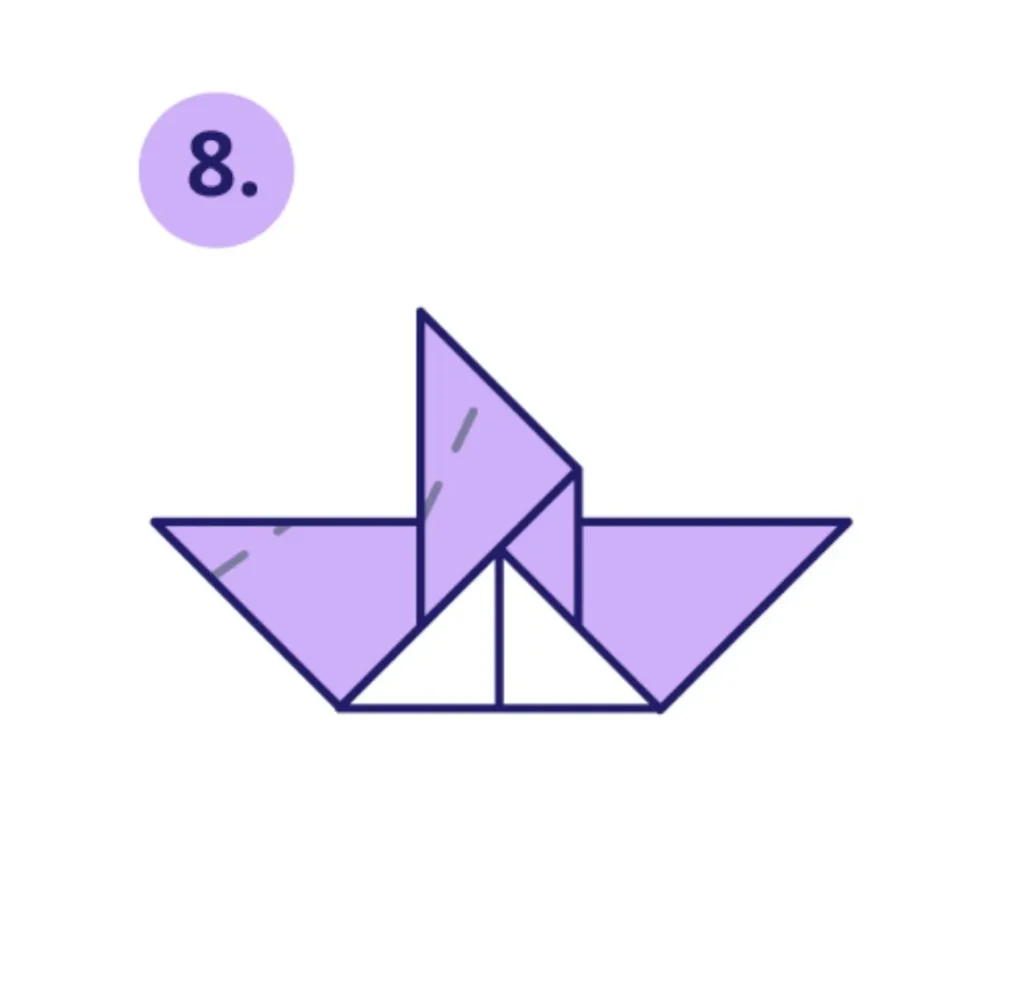
Let’s add more detail to the head and tail:
- Head & Tail Adjustments – Additional folds create the head, tail, and final shape.
- For a more defined head: Consider adding a small fold to create a beak.
- For the tail: Adjust the angle to balance the bird’s overall appearance.
- You can slightly pinch the head to create a narrower, more bird-like shape.
- The tail can be gently curved by running your thumb along its length.
These small adjustments make a significant difference in how recognizable your origami bird appears. The head and tail positions should balance each other—if the head points upward, the tail typically looks best pointed slightly downward, and vice versa.
Step 9: Final Adjustments
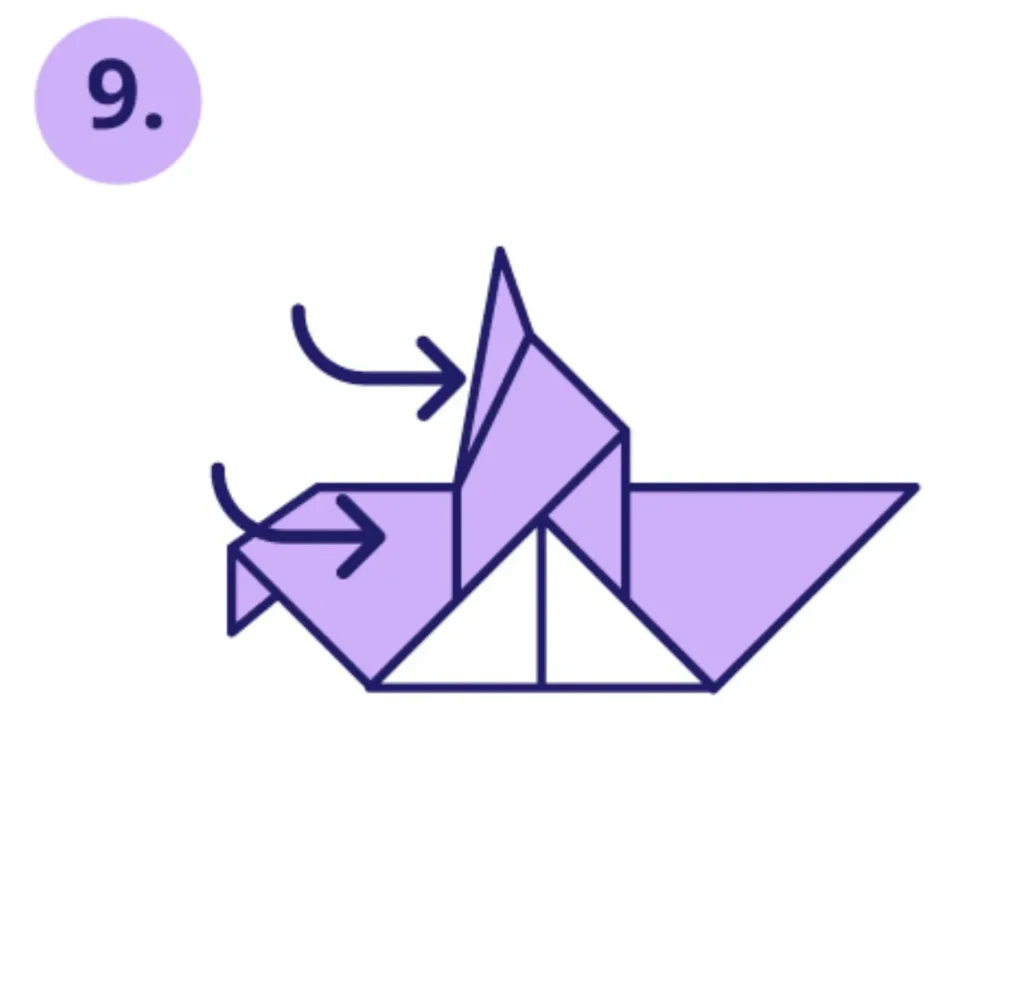
The last step brings your creation to life:
- Final Adjustments – Small folds and tucks refine the overall bird shape, ensuring it holds its structure.
- Stand back and look at your bird from different angles.
- Make any final adjustments to ensure symmetry and balance.
- Gently curve the wings by running your finger along their length.
- Ensure all creases are reinforced so your bird maintains its shape.
- Optional: Add small details like eyes with a pen or marker.
Congratulations! You’ve successfully created an origami bird from a single sheet of paper. This final step transforms your creation from good to great through careful attention to detail and proportion.
Creative Variations for Your Origami Birds
Once you’ve mastered the basic bird, try these creative variations:
- Use different colors or patterned paper for varied effects
- Create a flock of birds in different sizes
- Try metallic or translucent papers for special occasions
- Experiment with wet-folding techniques for a more sculptural appearance
- Add simple drawn details to enhance your bird’s personality
Display Ideas for Your Origami Creations
Your beautiful paper birds deserve to be showcased! Consider these display options:
- String several birds together to create a mobile
- Attach them to greeting cards for a 3D effect
- Place them on a windowsill where light can illuminate their form
- Create a nature-themed centerpiece with birds perched on branches
- Use them as unique gift toppers or place cards for special events
The Benefits of Practicing Origami
Beyond creating beautiful decorations, origami offers numerous benefits:
- Improves concentration and patience
- Enhances fine motor skills and hand-eye coordination
- Develops spatial reasoning and mathematical thinking
- Provides a calming, meditative activity
- Fosters creativity and problem-solving skills
Common Challenges and Solutions
If you encounter difficulties while creating your bird:
- Challenge: Uneven wings Solution: Unfold and refold, paying special attention to symmetry
- Challenge: Bird won’t stand properly Solution: Adjust the body fold to create a more stable base
- Challenge: Paper tears during folding Solution: Use a slightly thicker paper or fold more gently
Conclusion
You’ve just learned how to create a beautiful origami bird in nine simple steps! This elegant paper creation demonstrates the magic of origami—transforming a flat sheet of paper into a three-dimensional work of art through the power of folding.
Whether you’re creating decorations for your home, making gifts for friends, or simply enjoying a moment of creative focus, origami birds offer endless possibilities for artistic expression. As you practice, you’ll find your birds becoming more refined and elegant with each creation.
Remember, origami is as much about the journey as the destination. The focus required to create each fold provides a wonderful opportunity to be present and mindful—a welcome respite from our often hectic daily lives.
Happy folding, and may your origami birds take flight in your imagination!
Resources for Origami Enthusiasts
To continue your origami journey, check out these trusted resources:
- Origami USA (origamiusa.org) – America’s largest origami community with tutorials and annual conventions
- The Origami Resource Center (origami-resource-center.com) – Comprehensive instructions and patterns
- Robert J. Lang Origami (langorigami.com) – Inspiration from one of the world’s leading origami artists
- Origami Way (origamiway.com) – Clear, step-by-step tutorials for all skill levels
- Origami Spirit (origamispirit.com) – Beautiful designs with helpful video demonstrations
Remember that each paper bird you create carries with it the ancient tradition of origami—a beautiful blend of art, mathematics, and meditation that has brought joy to people around the world for centuries.