
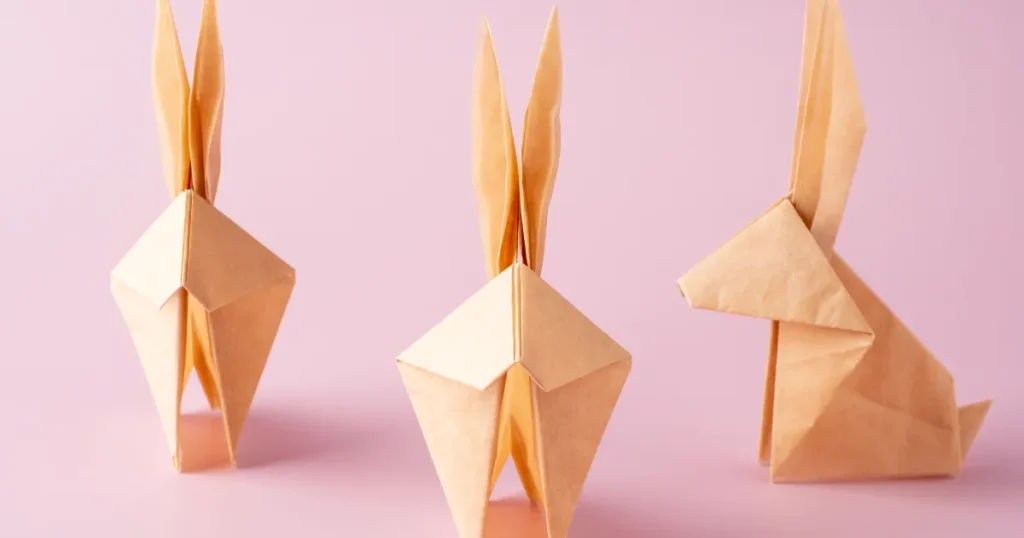
Have you ever wanted to create adorable paper animals but felt intimidated by complex origami designs? Look no further! This beginner-friendly guide will walk you through creating a charming origami rabbit using just a single sheet of paper. Perfect for crafters of all ages, this origami rabbit project requires no special tools or prior experience—just your hands, some paper, and a little patience.
Why Try Origami Rabbits?
Origami rabbits are an excellent project for beginners for several reasons:
- They require only basic folding techniques
- The finished product is instantly recognizable
- They make wonderful decorations or gifts
- The process is relaxing and satisfying
- They’re perfect for Easter, spring celebrations, or any time you want to add a touch of whimsy to your space
Let’s hop right into creating your very own origami rabbit!
Materials You’ll Need
Before we begin folding, gather these simple supplies:
- A square sheet of paper (origami paper works best, but any paper cut into a square will work)
- A flat surface to work on
- A few minutes of uninterrupted time
Pro tip: For your first attempt, choose a light-colored paper that’s not too thin or thick. This makes it easier to see the fold lines and create crisp creases.
Step 1: Start with a Square Sheet of Paper
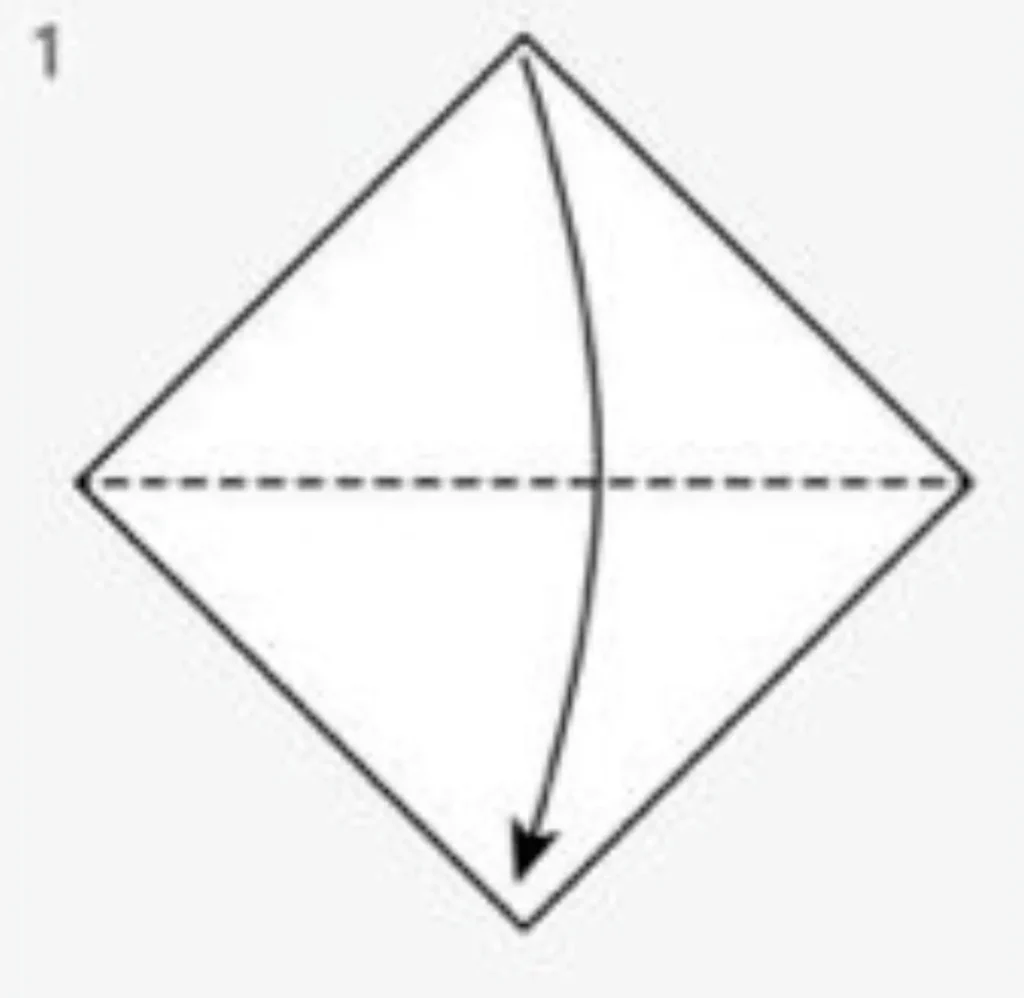
Every origami creation begins with the proper foundation:
- Take your square paper and place it in a diamond orientation (one corner pointing up, one pointing down, and the others pointing to the sides).
- Smooth out any wrinkles or creases in the paper before you begin.
- If your paper has different colors on each side, place it with your preferred outer color facing down.
- Fold it in half diagonally, bringing the bottom corner up to meet the top corner precisely.
- Press along the fold line to create a sharp crease.
- Unfold the paper—you’ll now have a visible diagonal crease forming a triangle when folded.
The precision of this initial fold sets the stage for all subsequent steps. Take your time to ensure the corners align perfectly, as this foundational triangle will determine the symmetry of your finished rabbit.
Step 2: Create the Base Folds

Now we’ll begin forming the structure that will become your rabbit:
- With your paper in the diamond orientation and the diagonal crease visible, take the left and right corners of the diamond.
- Fold these corners upwards to meet at the top point.
- Make sure the edges align precisely along the center crease.
- Press firmly to create strong creases.
- This creates a kite shape with two symmetrical flaps pointing upward.
This step establishes the basic form from which your rabbit will emerge. The kite shape you’ve created contains all the elements that will become your rabbit’s body, head, and ears—they just need to be revealed through further folding.
Step 3: Narrowing the Shape

In this crucial step, we begin defining your rabbit’s distinctive features:
- Identify the two outer edges of your kite shape.
- Fold the two side edges inward toward the center crease.
- These folds should be parallel to the center line.
- Make sure both sides are folded equally to maintain symmetry.
- This step helps define the rabbit’s face and ears by creating a narrower central section.
- Press firmly on all creases to keep the model flat and well-defined.
As you complete this step, you’ll notice your creation beginning to take on a more distinctive shape. The narrowed center will eventually form your rabbit’s face, while the top section will become the ears.
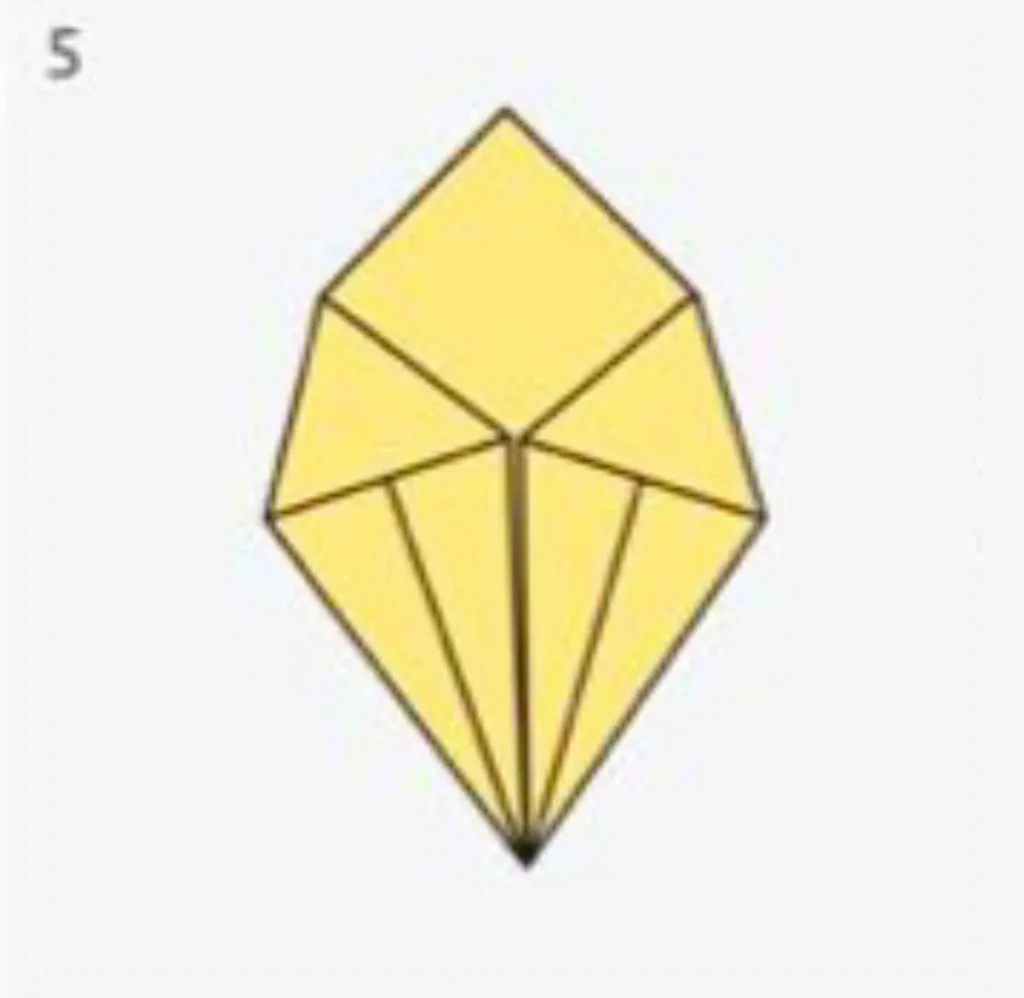
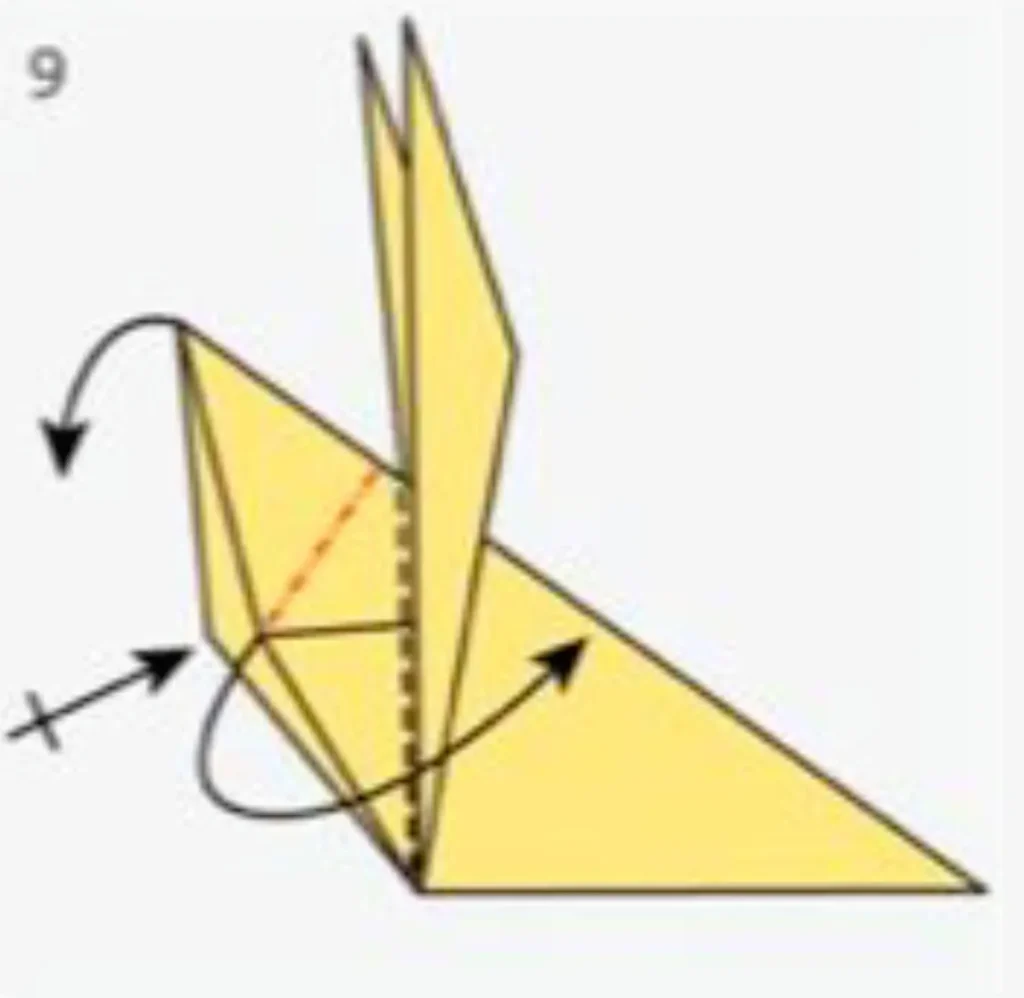
Step 4: Forming the Lower Part of the Body

Now let’s work on giving our rabbit some dimension and stability:
- Look at the bottom portion of your model (the point opposite the two flaps).
- Fold the bottom two corners outward at approximately a 45-degree angle.
- These folds create the base of the rabbit, allowing it to stand upright.
- Make sure these folds are symmetrical on both sides.
- This adds volume to the lower part of the model, transforming it from a flat shape into a three-dimensional figure.
- Press these folds firmly to set them in place.
This step is what allows your origami rabbit to stand on its own. The angles of these folds determine your rabbit’s posture, so take care to make them even on both sides.
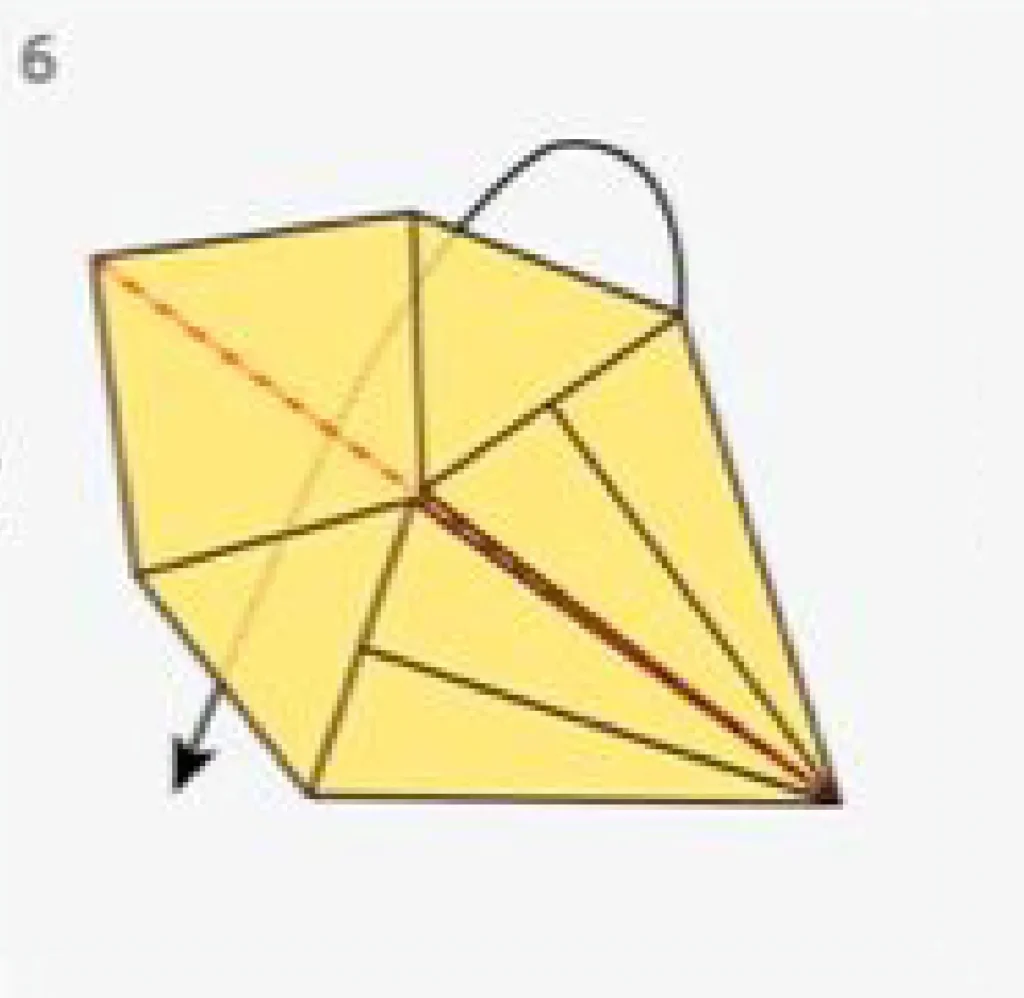
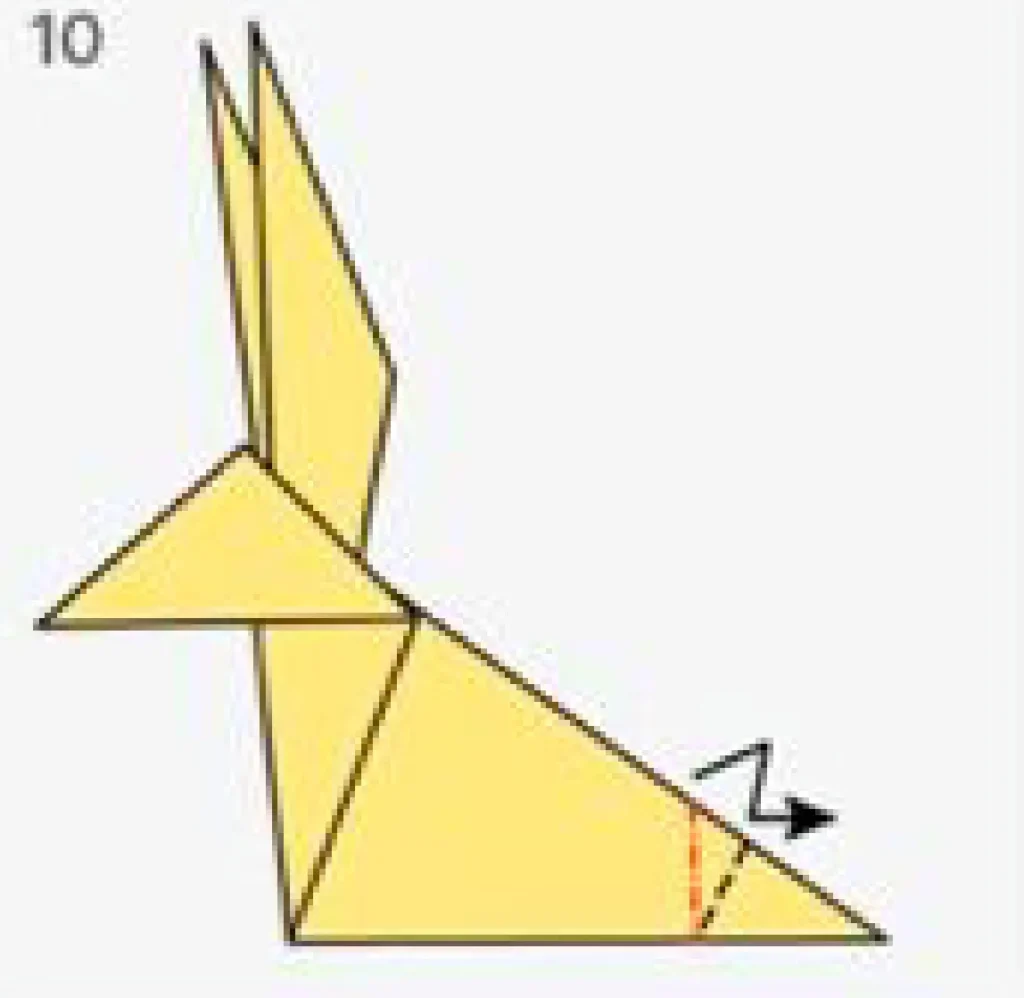
Step 5: Shaping the Head
Let’s give our rabbit a distinctive head shape:
- Flip the model over so you’re working with the reverse side.
- Identify the middle section of your model, which will become the head.
- Fold one side outward to create a head shape.
- This fold should be slightly angled to resemble the rabbit’s snout.
- The size of this fold determines how large your rabbit’s head will be in proportion to its body.
- Press firmly to set this fold in place.
The head shape is one of the most recognizable features of your origami rabbit. This angled fold transforms the geometric paper shape into something that unmistakably resembles a rabbit’s profile.
Step 6: Forming the Ears
No rabbit is complete without its signature ears:
- Look at the top section of your model.
- Identify the two flaps that will become the ears.
- Fold the top section to create two long, pointy ears.
- You can adjust the width and angle of the folds to create different ear styles.
- For floppy ears, make broader folds; for upright ears, make narrower, more vertical folds.
- You can adjust the fold to give the ears a natural look by slightly varying their angles.
The ears are perhaps the most distinctive feature of your origami rabbit. This step allows for creative interpretation—you can create a rabbit with alert, upright ears or one with relaxed, floppy ears depending on your preference.
Step 7: Refining the Shape

In this step, we’ll focus on the overall appearance of your rabbit:
- Take a moment to examine your creation from different angles.
- Flip and adjust the folds to improve the rabbit’s posture.
- Some folds may need to be slightly opened or refined to create a more natural shape.
- Gently pinch and adjust the head shape to make the face more defined.
- Ensure the base is properly folded so your rabbit sits in a natural position.
- Make minor adjustments to the ears to position them as desired.
These refinements transform a roughly rabbit-shaped fold into a polished origami creation. The small adjustments you make now will significantly impact the final appearance of your rabbit.
Step 8: Finalizing the Origami Rabbit

We’re now adding those finishing touches that bring your paper rabbit to life:
- Make sure your rabbit can stand properly on its base.
- If needed, adjust the bottom folds to create a stable foundation.
- You can slightly curve the ears by gently running your finger along their length.
- Adjust the head shape for a more realistic look by refining the snout area.
- Optional: Use a pen to add eyes or whiskers for more personality.
- Step back and admire your completed origami rabbit!

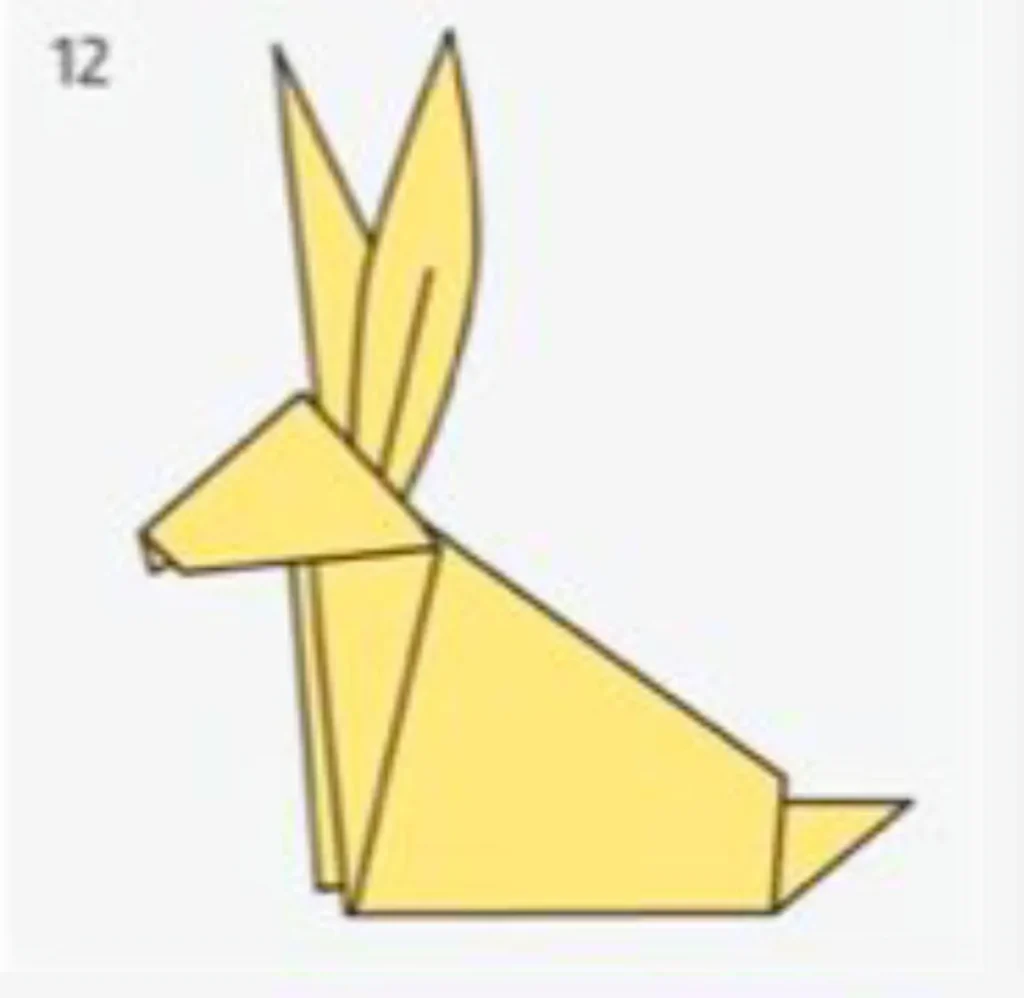
Congratulations! You’ve successfully created an origami rabbit using just a single sheet of paper. This charming creation demonstrates how simple folds can transform an ordinary square of paper into something magical.
Creative Variations for Your Origami Rabbit
Once you’ve mastered the basic rabbit, try these creative variations:
- Use patterned paper for a decorative effect
- Create rabbits in different sizes for a family of bunnies
- Try different colors to represent various rabbit breeds
- Add small details with markers or colored pencils
- Create a seasonal display with multiple rabbits in spring colors
Display Ideas for Your Origami Rabbits
Your paper bunnies deserve to be showcased! Consider these display options:
- Create an Easter centerpiece with several rabbits among artificial grass
- Place them on windowsills or bookshelves
- Use them as unique gift toppers
- Incorporate them into greeting cards
- Create a mobile by hanging several at different heights
Benefits of Practicing Origami
Beyond creating cute paper animals, origami offers numerous benefits:
- Improves concentration and focus
- Enhances fine motor skills
- Develops spatial reasoning and geometric understanding
- Provides stress relief and mindfulness practice
- Stimulates creativity and problem-solving abilities
Troubleshooting Common Issues
If your rabbit doesn’t quite look right:
- Problem: Rabbit won’t stand properly Solution: Adjust the base folds to create a more stable foundation
- Problem: Asymmetrical appearance Solution: Unfold and start again, paying careful attention to matching folds on both sides
- Problem: Ears don’t stand up Solution: Reinforce the ear folds with additional creasing, or slightly adjust their angle
Advanced Techniques to Try Next
Once you’ve mastered this basic origami rabbit, you might want to explore:
- Multi-piece origami rabbits with more detailed features
- Wet-folding techniques for a more sculptural appearance
- Action origami rabbits that can hop when pushed
- Modular origami where multiple units create a more complex rabbit
Conclusion
You’ve just learned how to create a charming origami rabbit in eight simple steps! This adorable paper creation showcases the magic of origami—transforming a flat sheet of paper into a three-dimensional work of art through the power of folding.
Whether you’re creating decorations for Easter, making a thoughtful handmade gift, or simply enjoying a peaceful crafting session, origami rabbits offer endless possibilities for creativity and enjoyment.
Remember, practice makes perfect. Each origami rabbit you create will be better than the last as you become more familiar with the folds and techniques. So gather some paper and keep folding!
Resources for Origami Enthusiasts
To continue your origami journey, check out these trusted resources:
- Origami USA (origamiusa.org) – America’s premier organization for paper folding enthusiasts
- The Origami Resource Center (origami-resource-center.com) – Comprehensive instructions for all skill levels
- Origami-Instructions.com – Step-by-step photo tutorials for hundreds of models
- Robert J. Lang Origami (langorigami.com) – Advanced techniques from a world-renowned origami master
- Origami Spirit (origamispirit.com) – Beautiful designs with video tutorials
Happy folding, and enjoy your new paper rabbit companion!